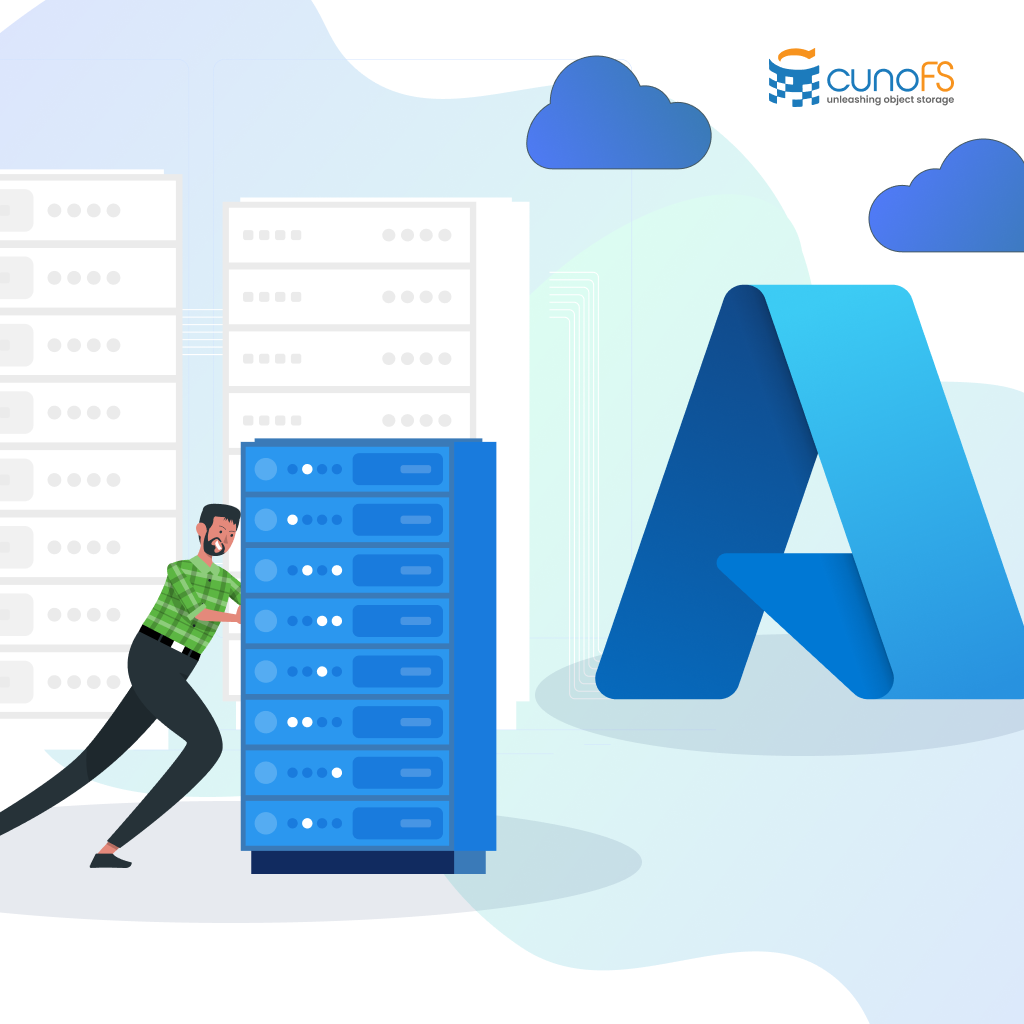
Migrating on-premises scientific workloads to the cloud has many benefits in terms of cost and performance that are attractive to both academic and business organizations. Microsoft Azure is a popular cloud platform within the scientific research community as it offers a variety of features and tools to build and scale the infrastructure for your workflows, as well as being cost-effective and scalable.
This article explains what you need to consider when migrating your workloads to Azure, and compares the best workload migration solutions. We explain how to set up your cluster, migrate your scheduling system, and choose appropriate file storage (spoiler: using cunoFS to access Azure Blob Storage wins).
What you need to consider before migrating your workloads to Azure
When you’re planning your migration you should ensure that Azure supports all the features you require for your workloads, both now and in the future. You don’t want to invest in migrating to a platform that later becomes unsuitable — both re-implementing your workflows and migrating your data will be expensive.
To encourage customer loyalty, cloud storage providers make it cheap to transfer data to their platforms but expensive to move it out. Azure is no exception, charging a big exit fee to export data.
On that note, you should understand Azure’s billing structure and plan costs ahead of time based on your expected usage. If you are struggling to predict your usage based on Azure’s pricing calculator, consider setting up a “test” cluster to measure actual usage over a short period, and then multiply it out.
Making a plan: mapping your on-premises infrastructure to Azure equivalents
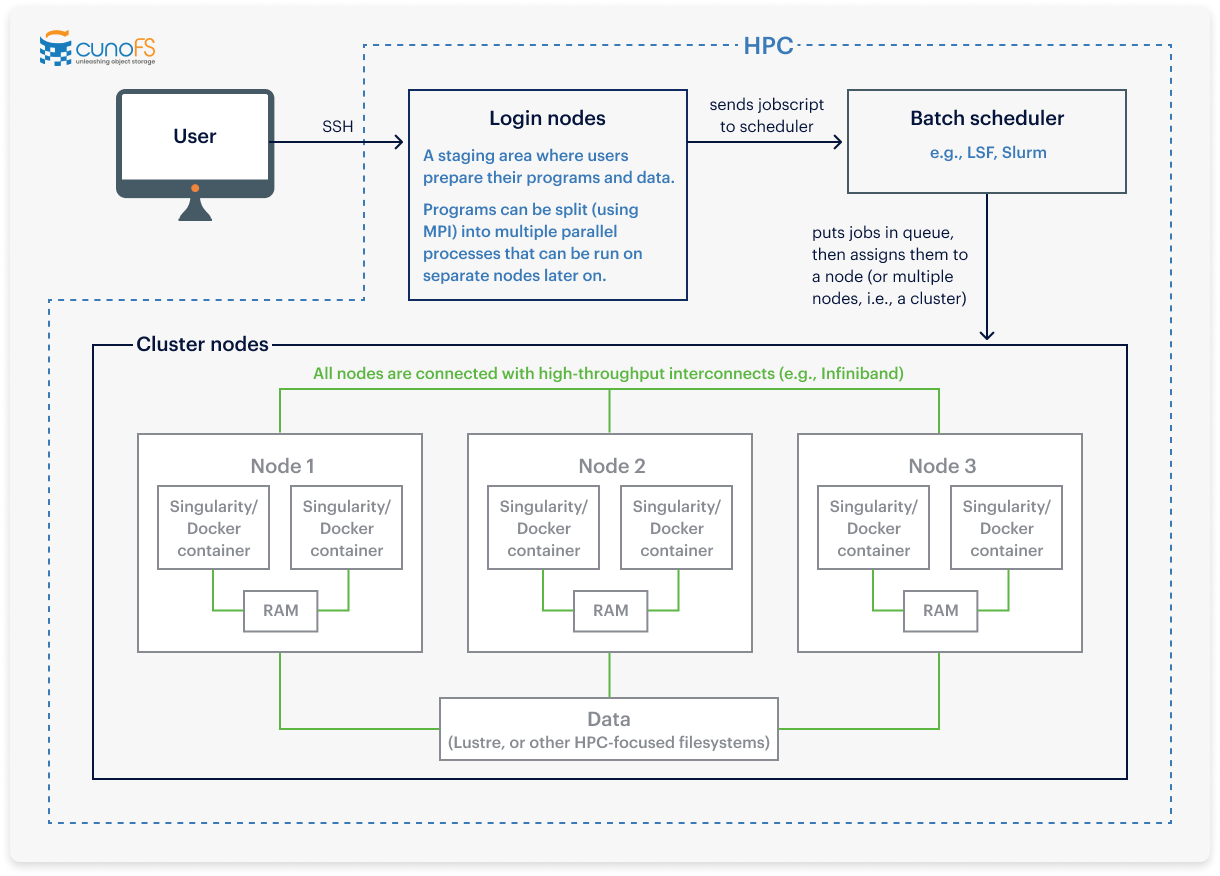
Diagram of a standard on-premises scientific workload, prior to an Azure migration
Two popular ways to run HPC workloads on Azure are CycleCloud and Azure Batch. As these have different structures, you will use different tools and components depending on which you are migrating to..
On-premises infrastructure | CycleCloud equivalent | Azure Batch equivalent |
Cluster nodes
| Azure Virtual Machines | Azure Virtual Machines |
Infiniband support | Azure VMs (HBv2 and H-series VMs with Mellanox ConnectX-6 Dx cards) | Azure VMs (HBv2 and H-series VMs with Mellanox ConnectX-6 Dx cards) |
Data | Filesystems (Azure Files, Azure Managed Lustre, Azure NetApp Files, Azure Data Lake Gen 2) or Azure Blob storage | Filesystems (Azure Files, Azure Managed Lustre, Azure NetApp Files, Azure Data Lake Gen 2) or Azure Blob storage |
Docker/Singularity containers | These can be migrated into Azure using CycleCloud. | If you want to migrate containers, we recommend using CycleCloud — as Batch Shipyard (the main way to migrate containers to Azure Batch) is no longer maintained. |
Job scheduler | Supports most of the big-name job schedulers (like Slurm, LSF, GridEngine, OpenPBS, and HTCondor). | Doesn’t support any existing schedulers, as Batch is a scheduler-as-a-service, so in a sense it is the scheduler. |
Login nodes | Scheduler VMs | These don’t exist in Azure Batch as they’re not needed: no-one logs in; instead you can have some code call the service to start a job. |
Job script files | These files would be stored in your cloud filesystem or object storage system. | You can’t directly migrate these to Azure Batch — you actually have to rewrite each job script file in either JSON or .NET (for more complex workloads). |
MPI support | Not available |
Choosing between Azure Batch and CycleCloud
At this stage (even before we get to storage), there are already significant differences between Azure Batch and CycleCloud, and you will need to choose which is best for your use case before proceeding with your migration.
For complex or advanced workloads, we recommend using CycleCloud over Azure Batch, as CycleCloud more closely mirrors the setup of most on-premises systems, making the steps of a migration easier to follow. However, for simpler applications, Azure Batch is easier to implement as it provides more out-of-the-box functionality as a job scheduler.
How to migrate your workloads and data from on-premises to Azure
After deciding whether to use Azure Batch or CycleCloud, you can then run through the following migration steps.
Migration step | CycleCloud | Azure Batch |
Select which scheduler you want to use | Choose between:
| You can’t reuse your existing scheduler with Azure Batch (as Batch acts as its own scheduler). |
Choose the type of VM for your cluster For high-performance computing VMs, we recommend the H-series as it offers Infiniband support. You can also choose whether to allow spot VMs or not here. Spot VMs give you a huge reduction in price by making use of leftover compute capacity — they can give a discount of 80–90%. However, you have to weigh this benefit against the possibility of your job being canceled at any time. The more VMs you have, the greater the chance of this happening. | CycleCloud has three different types of VMs:
The HPC VMs have Infiniband support. CycleCloud VMs allow for autoscaling. Provisioning: Machines are bare metal by default but can be provisioned (using “cloud-init” instructions). | Azure Batch doesn’t have a scheduler VM type. When selecting a VM type, you can choose between most types of Azure VM, including the same HPC VM types available with CycleCloud. The HPC VMs have Infiniband support. Azure Batch VMs allow for autoscaling. Provisioning: You can create custom VM images provisioned with whatever software you need. |
Set up the compute cluster | Create a new cluster of Virtual Machines. Follow this useful step-by-step CycleCloud migration guide video. | Create a pool of Virtual Machines. |
Choose your storage type | Choose between:
| Choose between:
|
Migrate your production data | Migrate your user data and jobscript files to your new storage. | Migrate your user data to your new storage You will need to create your own .NET files for Azure Batch jobs and the tasks that comprise them. These files can be stored in your new Azure storage system. |
What’s the best way to store your data when running your workloads in the cloud?
If you already have an on-premises scientific workload written in a language like C, C++, Python, Java, or Bash, it most likely relies on native filesystem access or uses a framework like Spark or Hadoop. Either way, the underlying way of accessing the filesystem is going to be POSIX, or something very close to POSIX (such as HDFS with Hadoop).
For this reason, it’s important that any Azure storage option be POSIX-compliant to avoid having to re-implement your already-functioning workflows for a new storage API. Azure has several storage options that are POSIX-compliant:
- Azure Files — This is the standard filesystem option for Azure. Despite being the slowest of all the Azure storage options, it isn’t the cheapest.
- Azure Managed Lustre — A managed pay-as-you-go filesystem for HPC workloads, Azure Managed Lustre has better performance than Azure Files but is more expensive to use.
- Azure NetApp Files — This is the most expensive option but it is seriously fast! This is worth considering if money is no object.
- Azure Data Lake Gen 2 — This option is only suitable for Hadoop or Apache Spark scientific workloads.
- Azure Blob storage with cunoFS — Azure Blob storage is both fast and cheap. On its own it is not POSIX-compliant; however, pairing it with cunoFS changes this. With cunoFS, Azure Blob storage can be used as a highly POSIX-compliant filesystem with your existing applications.
Traditionally, developers needed to either stage files (locally or to a scratch filesystem like Azure Managed Lustre) while they were being worked on, or rewrite their code to use the Azure Blob storage API if they wanted to get the cost-saving benefits of Azure Blob storage due to its lack of POSIX-compliance out of the box. Both of these options are time-consuming and error-prone.
cunoFS is a no-compromise solution to using object storage with your established HPC applications. It is a high-performance POSIX-compatibility layer that you can add to object storage systems (such as Azure Blob storage). Once you’ve installed it, it allows you to continue to make filesystem calls within your code, transparently converting them to API calls compatible with Azure Blob storage. If you’ve ever mounted an NFS filesystem before, this will be familiar as it works in a very similar way.
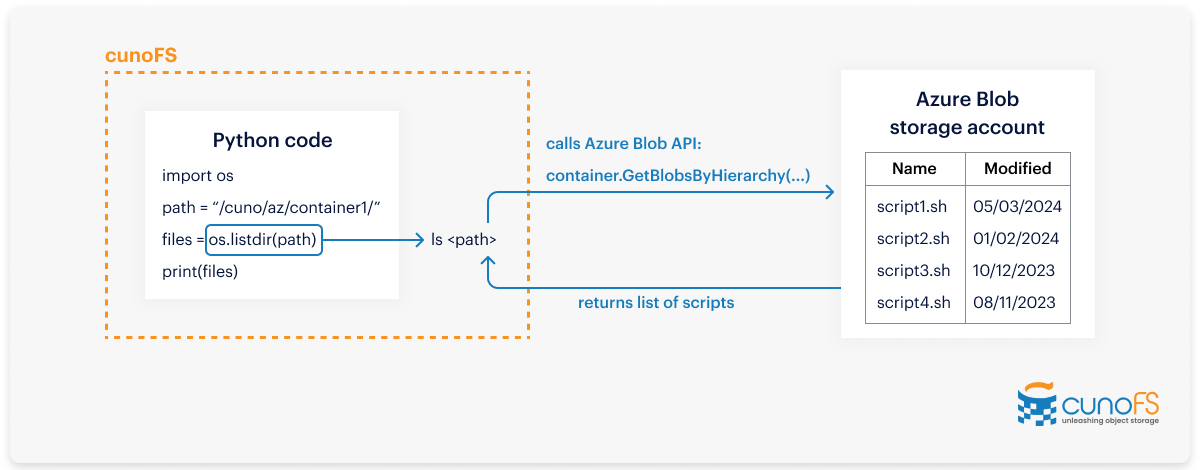
Diagram showing how cunoFS sits in between your code’s call to your filesystem and your Azure blob storage account
Azure Blob storage is more affordable than the other storage alternatives in the Azure ecosystem. In combination with cunoFS, it can be used as a performant filesystem for almost any scientific, ML, or other HPC workload.
How to use cunoFS to turn Azure Blob storage into a high-performance filesystem
- Create an Azure
Blob storage container. Set up your Azure Blob storage.
- If you’re using CycleCloud, choose an NFS filesystem and select Azure Blob storage from within there.
- If you’re using Azure Batch, at the time of creating a new Batch account you will be given the option to create an Azure Blob storage account and attach it to your Azure Batch account.
We recommend choosing the zone-redundant storage (ZRS)
option, which maintains three copies of your Azure Blob storage data in different availability zones. It’s
also a good idea to keep your Azure Virtual Machine and Azure Blob storage in the same region for the best
performance.
- Install CunoFS on your on-premises nodes.
- Copy your data into a container on your Azure Blob storage account. There are a number of tools to use for this, such as AzCopy. However, you can use cunoFS itself for the migration. As you’ll be using cunoFS in your final deployment, and also because of its speed advantage, it’s a great tool for this. cunoFS also supports retaining vital POSIX metadata when copying to blob storage (such as user and group IDs, permissions, timestamps, and symlinks/hardlinks), which other tools do not do. You can use cunoFS to copy your data into the container — and as everything is POSIX-compliant, you can use the rsync and diff commands to copy and verify the data.
- Check that cunoFS can read from your Azure Blob container by typing cuno and pressing enter to start the interactive shell. Once in interactive shell mode, type ls az://<account name>/<container>/<path> to list the files in that path, thus confirming that cunoFS has access to your Azure Blob storage system.
- Check that you can use cunoFS from within your code. Within your code, replace all filesystem paths with the cunoFS path. If your base filesystem path is stored as an environment variable, you’ll only need to replace the path once. An example of some Python code you could use to test this is:
- You will need to use the command cuno run python3 test.py to run this test, rather than the standard python3 test.py command. This lets cunoFS redirect any POSIX filesystem calls made by Python (or any other app) to S3.
- Run your workloads to verify that everything is working . Run a local workload and an Azure workload with exactly the same information and verify that the outcomes are the same. If these applications modify or lock files, you should not run them at the same time.
import os
path = “/cuno/az/your-azure-storage-account/bucket1/”
dir_list = os.listdir(path)
print(dir_list)
Migrating your ML and HPC workloads to Azure has performance and scaling benefits, but beware vendor lock-in
Whether you are looking to burst into the cloud during high demand for your HPC systems, or replace your on-premises hardware, migrating your ML and scientific workloads to Azure can greatly improve the effectiveness and cost efficiency of your infrastructure. However, maintaining separate applications for your local and cloud-based workloads adds overheads, so it’s important to choose tools that protect against vendor lock-in, just in case there’s a shift in pricing structure, or your use case expands beyond the capabilities of your chosen cloud platform.
By using cunoFS to access blob storage as part of your cloud hosted HPC and ML systems, you can keep your code platform-agnostic, and run your workloads using data hosted in object storage while getting the performance benefits of POSIX-compliant filesystems.
You can try out cunoFS for free, or sign up for a commercial license.